Wednesday, November 26, 2014

The Perfect Palette!

Hello Beauties!

Can you guess what this blog post is about?  After my last very serious blogpost, I thought I would do something fun that would give you more insight into my favorite eyeshadow palettes.  Over the past few months I have seen several of my Favorite YouTube Gurus doing this tag so I thought it would be a ton of fun!  


Warning:  I am an eyeshadow palette hoarder as you can see, so be prepared!


1.  Best Packaging?

Marc Jacobs Beauty Style Eye-Con No. 7 Plush Shadow 
$59.00


The Lolita 206

It is a sleek and slender design.  The palette does not take up a lot of space and is a great on-the-go palette.  It comes in a cloth case which I have kept so I don't get it all scratched up.  I just absolutely love the packaging on this palette.  

2.  Best Color Payoff?

Urban Decay Naked Palettes 1, 2, and 3
$54.00


Naked 1 - Warm toned neutrals
Naked 2 - Cool toned neutrals
Naked 3 - Rose toned neutrals


Hands down, the Urban Decay line of shadows have the best color payoff.  They are so smooth, buttery and pigmented.  They have very minimal fall out and I have never been disappointed in anything I have purchased from Urban Decay!

3.  Most Versatile?

LORAC Pro Palettes 1 & 2
$42.00


LORAC Pro Palette 1


LORAC Pro Palette 2 


I love love love these palettes.  They both have an even distribution of matte and shimmers.  I have done so many looks with these palettes, from the everyday look, to a dramatic night-time look.  I feel these palettes have the most bang for your buck.  I cannot say enough good things about these.  

I have also purchased the LORAC Pro Mega Palette which is a limited edition palette I found on Amazon.  It was a limited release and from time to time will pop up on Amazon.  So, if you haven't already gotten your hands on it...Stalk Amazon!

4. Best for Travel?

Urban Decay Naked Basics Palette 
$29.00


When this palette first came out I went to Sephora, swatched it, and quickly decided the palette was not for me.  Months later, my little cousin told me I "have to have it!"  So, low and behold, it arrived on Christmas day.  I have not been able to put it down since!  I use this almost every time I wear makeup and it is always in my travel bag.

It's Judy Time palette by BH Cosmetics
Original Price $20.00 but now you can get it for $8.95 while supplies last on bhcosmetics.com


I am going to cheat on this one because I have found myself reaching for this palette on recent weekend trips.  It has a wonderful assortment of nudes with some colors added in.  It has wonderful pigmentation!  For the price, you really can't beat it!

5.  Biggest Regret?

L'Oreal Colour Riche Eyeshadow Quad
$7.99 - $9.99


Why dear God... why do I fall victim to purchasing these quads in hopes of better quality?  I love L'Oreal but these eyeshadows are such poor quality based on drugstore standards.  The drugstore companies have really stepped up their game lately so come on L'Oreal... I know you can do it!  I love their Infalliable eyeshadows and I loved the eyeshadows from their HIP Studio line (that are now discontinued).  I know they are capable of better.  These shadows are poorly pigmented and so flaky.  I really tried but I only have one word...Ugh!

6.  Best Color Names?

Too Faced Chocolate Bar Eyeshadow Palette
$49.00


With names like Milk Chocolate, Amaretto, Champagne Truffle, and Cherry Cordial, this palette is an absolute winner in more ways than one.  Not only does it have the cutest names, it smells like cocoa!  This palette has a wonderful assortment for colors with several finishes.  I consider this palette to have a majority of nudes with complimentary pops of color thrown in.  The colors are also beautiful and the shadows are very pigmented.

7.  Least Used?

Urban Decay Smoked Eyeshadow Palette
Originally $49.00 but now on sale for $29.00 on UrbanDecay.com


I got this on sale a while ago so I am not too sad about it.  The colors are smokey, deep and beautiful!  However, I am a neutral girl.  I default to the nude and more subtle colors.  This is what makes it the least used in my collection.  However, when I do reach for it, I am impressed by the pigmentation of the colors.  

8.  Most Used, Most Loved, Desert Island Palette?

Drum roll please....

LORAC Pro Palette 1!


I love, Love, LOVE this palette so much!  The swatches don't even do these eyeshadows justice!!!!! This is my ride or die palette and I use it for every major event.  I recently used it while doing my own makeup for my cousin's wedding and loved the outcome.  Not only are the colors so wonderfully pigmented, but they also last!  They do not fade during the day.  The palette, like I said above, is half matte and half shimmer so it is very versatile to use.  If you are a beginner with makeup and want to start of with a palette, I highly recommend this one!  You will not be disappointed.  

I hope you all found this blogpost to be enjoyable!  If you have any questions, comments, feedback or requests, please leave them down below.  Don't forget to follow my blog so you can be up to date.  Also, be sure to follow me on Instagram and Twitter, both @geek2chicbeauty for updates, mini reviews, hauls, etc!  Stay beautiful, Stay true!

Geek2Chic - Christine 

Saturday, November 22, 2014

What's in my Makeup? The Truth About Parabens

Hello Beauties!

In today's blogpost, we will be discussing the truth about parabens.  Lately, I have noticed there are a lot of cosmetic brands that are going "paraben-free".  I feel that all ladies and gentlemen need to be smart consumers, myself included.  I want to know what I put on my face and body.  Is it dangerous?  What does it cause?  What the is a Paraben??? As a physician, I have done a ton of research into parabens.  I would like to share this information I found during my  research with you and include my thoughts at the end.  

What are Parabens?

A paraben is an ingredient frequently used in cosmetic and body products as a preservative.  They are very effective in preventing growth of bacteria and fungus.  Parabens basically prevent the product from spoiling and growing a colony of micro-organisms.  This will make your products last longer making them safe to use day after day.  

Parabens are derived from p-hydroxybenzoic acid (aka para-hydroxybenzoic acid aka 4-hydroxybenzoic acid aka PHBA).  PHBA are naturally occuring and found in fruits and vegtables.  

How do you spot them in your products?

The most common parabens used are:

  • Benzylparaben
  • Butylparaben
  • Ethylparaben
  • Methylparaben
  • Propylparaben

Basically, look for -paraben in the ingredients.  

Are Parabens safe?

A study was done in 2004 that shows parabens present in breast tumors. (1)  The study discussed its weak estrogen like properties and the influence that estrogen has on breast cancer.  I personally read through and analyzed this study and it leaves a ton questions left unanswered.  First, it's a very small sample size...  For those of you non-scientist, the more people you have to analyze, the stronger your study is.  Secondly, do the parabens directly cause cancer?   Are they in other tissue as well?   Ahh!  The confusion!!!!  

Although the FDA is not allowed to approve cosmetic ingredients (minus color additives), they have been keeping a close watch on the paraben controversy.  Parabens are used at incredibly low levels in cosmetics and body items.  Other studies have been done that show, based on a person's daily exposure, it is "implausible" that parabens could increase risk associated with exposure to estrogen-like chemicals. (2)  Basically, you would need to OVERDOSE on products containing parabens to cause any harm. Per the FDA.gov:

The Cosmetic Ingredient Review (CIR) reviewed the safety of methylparaben, propylparaben, and butylparaben in 1984 and concluded they were safe for use in cosmetic products at levels up to 25%.  Typically parabens are used at levels ranging from 0.01 to 0.3%. (3) 

The "FDA believes that at the present time there is no reason for consumers to be concerned about the use of cosmetics containing parabens."(3) 

Can you be allergic?

An allergy to parabens is quite rare but not completely uncommon.  If you are sensitive, you would see skin irritation or a contact rash after use of a product that contains parabens.  

My thoughts...

Now that I have done my research and I am well informed I feel much better about giving my opinion on the topic.  All in all, there is insufficient evidence and studies on the topic.   There is no good study that prove parabens have a direct link to cancer in humans.  So, although parabens have estrogen like properties...they are very weak!  Much weaker than the natural estrogens produced by the human body.   

Now, knowing what I know...I will not take any special precautions in avoiding parabens.   Overall, they keep your products clean and keep bacteria and fungus at bay.  A clean product is a happy product and a happy product is a happy face, thank you very much!  

I hope you all found this blogpost to be helpful.  I want you all to be well informed, so now you can make your own decision.  Please leave any comments, feedback, or requests down below.  Also, you can follow me on both Instagram and Twitter - both @geek2chicbeauty for updates, mini reviews, hauls, etc!  Stay Beautiful, Stay True!

Geek2Chic - Christine  

Resources:
(1)http://www.dr-baumann.ca/science/Concentrations%20of%20Parabens%20in%20Human%20Breast.pdf
(2)http://www.ncbi.nlm.nih.gov/pubmed/16097138
(3)http://www.fda.gov/Cosmetics/ProductsIngredients/Ingredients/ucm128042.htm

Wednesday, November 19, 2014

Epic Beauty Battle: Hourglass vs. NYX

Hello Beauties!    

Today's blogpost will be an Epic Beauty Battle!  I will be comparing two of my holy grail makeup items head to head.  Several months back, I received a sample of the Hourglass Veil Mineral Primer.  I quickly fell in love with the product and finished the sample even quicker!  I headed to Sephora to pick up the full sized and had a little sticker shock.  Luckily, I have wonderful family members and got it on my birthday.  Since then I have been trying to find a good dupe.  I will be comparing the Hourglass Veil Mineral Primer to the NYX Angel Veil Skin Perfecting Primer. 
           
Hourglass Veil Mineral Primer 
NYX Angel Veil Skin Perfecting Primer


The Claims:

The Hourglass Veil Mineral Primer Claims...
  • A mineral-based, water-resistant primer with SPF 15 that neutralizes the skin, minimizes shine, and creates a smooth uniform canvas for flawless makeup application. 
  • Clean, satin-finish formula helps keep makeup looking fresh and prevents fading.
  • Veil Mineral Primer also absorbs excess oils and minimizes the appearance of pores by evenly distributing light to help hide and soften skin imperfections and fine lines. 
The NYX Angel Veil Skin Perfecting Primer Claims...
  • This super silky, light and fresh formula creates a comfortable cushion on your skin to enhance makeup application.
  • Creates a smooth, uniformed canvas that minimizes shine and makes application flawless.
  • Your skin will feel like it has been TOUCHED BY AN ANGEL?

The Facts:


The Hourglass primer comes in a glass bottle with a pump (gotta love a pump!).  As you can see, it comes out white but when applied to the skin, it becomes undetectable. 

You can find Hourglass products at Sephora, HourglassCosmetics.com, and Barney's.  

It comes in three sizes:

0.33 Oz - $18
1.0 Oz   - $52
2.0 Oz   - $72 (Comes in a squeeze tube)


The NYX primer comes in a squeeze plastic tube.  It is also white in color and glides seamlessly onto the skin for an undetectable finish.

You can find NYX products in Ulta, NYXCosmetics.com, Urban Outfitters, and select drugstores (I have seen it at CVS and Target in NJ).  

It only comes in one size: 

1.0 Oz - $16


In My Geeky Opinion: 

How to Apply?

I applied both products with my fingers.  The Hourglass Primer is applied to the Left side when looking at me and the NYX primer on your right hand side.  It is smooths out to be undetectable and neither of them leave a white cast.  


<----Hourglass Primer   NYX Primer---->
Please note... My face is usually lighter than my neck and chest...I exfoliate! And yes, I do need tons of sleep.  Thank goodness my under-eye concealer is amazing.  

Texture?

They both have a very silky feel as you massage it into your skin.  Like I mentioned previously, you cannot even tell you have anything on your face!  The finish is very smooth.  I did notice that the NYX primer is thicker compared to the Hourglass Primer.  

One thing I did notice on part of both primers is that you have to shake them well or else the product settles and they both come out very liquidy. 

SPF?

The Hourglass product has SPF 15.  The NYX primer does not mention SPF anywhere on the website however it contains Titanium Dioxide (they both do).  Titanium Dioxide reflects UVA & UVB rays to protect the skin.  It is used as an alternative to chemical-based sunscreen agents.  So even though its not written anywhere, it does have an ingredient to protect your skin.  

With flash photography, neither primer gives a white cast to the face.  

So who should wear this?

I think both these products would be best for combination to oily skin.  Whenever I have dry patches on my skin, the products cling on to them and the foundation does not go on as smoothly as I would prefer.  Also, if you are of a dark complexion, these products may appear very ashy when applied. 

How long does it wear?

So this is me before a shift at work.  As you can see, you cannot tell the difference between each side.  


7 hours later.....This is me hard at work!  Makeup looks good!  I am not oily or shiny or greasy looking.  My blush stayed on both sides rather well and the foundation is keeping up with my busy work day.  


12 hours later....This is at the end of my work day.  Now both sides are shiny, the hourglass side less so but my blush is more prominent on the NYX side.  I do see more fading and breakdown of the foundation on the Hourglass side but very minimal.  All in all I look decent for 12 hours after initial makeup application.  

Hourglass
NYX


The Final Verdict:  

These two products are my HOLY GRAIL products.  I always reach for either one.  I love how they both smooth out my imperfections and fine lines.  I love the texture, the wear they given my makeup and they do not break me out.  Overall, I would recommend these products to anyone!

Who Won?

I have to give it to NYX!  I am sorry Hourglass, I love your products but my wallet sure doesn't.  I would say NYX is wonderful dupe and with a better price point... DING DING DING...This battle is over! 

I hope you all found this edition of Epic Beauty Battle helpful!  Please leave any comments, feedback, or requests down below.  Also, you can follow me on both Instagram and Twitter - Both @geek2chicbeauty for updates, mini reviews, hauls, etc!  Stay Beautiful, Stay True!

Geek2Chic - Christine 

Wednesday, November 12, 2014

Makeup 101: How to Clean Your Makeup Brushes

Hello beauties!   It's that time again... Time to clean my makeup tools.  I thought it would be a good idea to blog about how I clean them!  When I first started dabbling in the makeup world,  I had no idea how to clean my brushes!  I would use them over and over and over again.  Looking back at it...that was kinda gross but then again, all teenagers go through a gross faze (no offense).  Well, since then, I have educated myself and I thought I would educate you all as well.  


So why do we clean our makeup tools?

Our used makeup brushes harbor old makeup, oil, dirt, and bacteria.  There is only one word for that....Ewwwwwww!  Who wants that all over their face?  NOBODY!!!!  This is why it is important to clean your brushes often.  I generally use my brushes a few times before I put them in the "do not use pile."  Between uses I will do spot cleaning with a makeup brush cleanser. Then, every two weeks, I do a deep cleaning of all my brushes.  

So what can you use?

These are just some of the cleaning products that I use.  Not all of them are necessary; I just want to give you beauties some options :)

Brush Cleaner

Dawn Antibacterial Dish Soap (or Baby Shampoo) and Olive Oil 

Solid or Liquid Brush/Sponge Cleanser or White Soap 

Kitchen Gloves and/or Rubber Oven Mitt

Bowl and Towel 


Spot Cleaning

I generally do spot cleaning between each and every use.  This is a super quick and easy way to clean the makeup off my brushes.  This is especially helpful when you're using colorful eyeshadows so you don't have any color left behind. The spot cleaning processes is very easy.    


 Step 1: Take your dirty makeup brush and your choice of cleanser.  If it's not in a spray bottle, you can make the process easier by purchasing one at the drug store.  Just spray 1-2 spritzes to the brush bristles.  


 Step 2: Take a paper towel (or makeup remover wipe) and in a circular motion, run the bristles over the towel.  

 And ta-da!  There you go...you have spot cleaned your makeup brush.  Easy, right?

Deep Cleaning Beauty Sponges

There are two methods that I use to deep clean my beauty sponges.  I do this after each and every use of the beauty sponge.  I use the Beauty Blender: Beauty Cleanser Solid or Liquid.  These products can be found online or in Sephora.  This product is a touch pricey so I also recommend a white bar of unscented soap.  I have used Dove or Cetaphil bar soap in the past with similar results.  If you prefer a liquid, you can also use dawn antibacterial liquid soap or baby shampoo.  


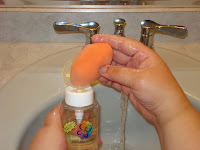
Step 1: Take your beauty sponge and run it under lukewarm water till its saturated.  


Step 2:  Rub the sponge into the solid cleanser or the bar soap in circular motions.  Really work the cleanser into the sponge so you can remove all the makeup residue.  

 Step 3: Once again, take the sponge and run it under lukewarm water while squeezing to remove all the gunk.  

-OR-

Step 2b:  Take the wet sponge an apply the liquid cleanser.  Work the product into the sponge.


Steps 1 and 3 are the same as above

And there you go!  A clean disinfected sponge.  


Deep Cleaning Makeup Brushes

There are also two methods I use to clean my makeup brushes. It just depends on how lazy I am feeling.  I either use a solid bar of soap or the solid beauty cleanser like we did above - or - I use a combination of dish soap and olive oil.  You may ask yourself...Why olive oil?  Well, the oil really helps to break down the makeup products especially with the dark eyeshadows.  It also conditions your brush bristles keeping them soft.  

Take a look at how dirty this makeup brush is!  
Step 1: Get the bristles of the brush wet. Make sure to keep the brush upside down.   
Step 2: In circular motions, run the bristles over the solid cleanser or the bar of soap.  You will see the makeup starting to break up while you do this.  
Step 3:  Work the brush with the product over an oven mitt or glove.  The reason why I use an oven mitt is because it has a ton of ridges to get the residue out.  
Step 4:  Run the brush under lukewarm water (with the brush facing downwards) to rinse the makeup and product out of the bristles.  Honestly, sometimes this step takes a bit of time because I can still feel that the brush is soapy.  Sometimes I will repeat steps 2 and 3 if the bristles aren't clean.  When the bristles are all clean, ring the water out between your thumb and your hand.   
Step 5:  All clean!  Now place the brush down on a towel and leave it to dry.  
-OR-


Using the liquid soap and a little bit of olive oil, mix them together in a bowl.  When I say a little bit, I mean a little bit!  Go for an 80/20 mixture of soap to olive oil.  Otherwise the bristles get too oily.   
 Step 2b: Dip the brush into the concoction.   

Repeat the other steps as directed above and you will have a clean brush!


So, a few helpful hints when you are cleaning your brushes.  These are things that I wish someone would have told me instead of finding out the hard way!  
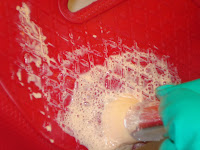
  • Cleaning your makeup tools will take some time!  I usually do it on an evening where I have an hour or two free.  I will have music playing or have my iPad in the background watching YouTube.  
  • Use kitchen gloves.  The first time I tried doing this, my hands came out so pruney looking!
  • Always point the makeup brushes down when you are wetting them.  If you get water into the ferrule of the brush it can separate the bristles from the glue or cause rust and destroy your brushes.  
  • Make sure you clean out all the product from your brushes.  The residue can build up if not rinsed properly and affect the bristles and your next use.
  • Let the brushes lie down flat or upside down to dry.  Do not place them right side up into a brush holder until they are completely dry.
  • Let your brushes dry for 24 hours before reusing them. 


I hope you beauties found this edition of Makeup 101 helpful!  Please leave any comments, feedback, questions, or requests down below.  You can also follow me on Instagram and Twitter @geek2chicbeauty for updates, mini reviews, hauls, etc!  Stay Beautiful, Stay True!

Geek2Chic - Christine